9.08.2009

Mac OSX: Changing Login Screen Desktop Picture

It would look odd whenever you lock your screen (showing Login Window) it will show the default desktop picture instead of your customized desktop picture. To change the default desktop picture, you will need to know where your picture is stored. Open the terminal from Application>Utilities and type the following:

  • cd /System/Library/CoreServices
  • sudo mv DefaultDesktop.jpg DefaultDesktop_original.jpg
  • sudo cp Path/image.jpg DefaultDesktop.jpg
Thats it! you've just renamed the original desktop picture used in Login Windows to DefaultDesktop_original.jpg and copied your image from Path\image.jpg as DefaultDesktop.jpg. Have fun!

8.21.2009

Mac OSX: Create ISO CD/DVD image (.iso)

So I tried searching around but couldn't find a clear solution on this. I had to retrieve bits by bits and visit some forums which takes time. Anyhow, without further ado, here are the steps in creating an ISO CD/DVD image from OS X using Terminal app so you won't need any additional third party software. The steps are as the following:


Open Terminal.app from Utilities folder under the application, then you will need to see where your dvd/cd is under (usually it is in /dev/disk1) by typing:
drutil status

From there find the word "Name" which represents the accessible directory.

Unmount the disk to ensure that the disk is not locked by the OS so you can create a perfect duplication of the disk by typing:
diskutil unmountDisk /dev/disk1

Then, create the ISO file by typing the following:
dd if=/dev/disk1 of=nameOfDisk.iso bs=2048

Wait while the disk is being duplicated as nameOfDisk.iso is being created. Not that this copies exactly the disk you are duplicating so it can also be bootable.

That it! Good luck!

6.26.2009

Red Mango: Finally a competitor to Sour Sally arrives @ Indonesia, Giving away BlackBerries?


Red Mango, a competitor of Sour Sally (currently the leading frozed yoghurt franchise in Indonesia) arrives at Indonesia. Said to be opening at Mall Taman Anggrek first and will give away free BlackBerry 8900 Curves to surveyors by following this link. Well who knows? Try it on!

6.24.2009

Facebook: Street Racing Script Tutorial

Okay, since some of you have been asking me how to install and I had to give a step-by-step instructions everytime, I present you a tutorial on how to install these scripts.

Well first you must install Greasemonkey for Firefox (if you can't then find in google). Once installed, you will see a new menu in the "Tools" part of Firefox which consist of Greasemonkey or you can simply have a look at the lower right part of the Firefox window (right side of the status bar).

Secondly, have my scripts ready at hand, extracted and viewable with any text editor.

Now right-click on it and select "New User Script..." (Repeat these steps 3 times for SRAutoXP, LoopAutoXP, SROutOfBounds) as shown below:
Now, a new script window will appear (for first time installs, usually it will ask for a preferred text editor, select notepad for pc or textedit for mac)
Enter these information accordingly to the scripts in the box:
SRAutoXP

  • Name: SRAutoXP
  • Namespace:*
  • Description:
  • Includes (One per line):
    -http://apps.facebook.com/streetracinggame/fight.php*
  • Excludes (One per line):
LoopAutoXP
  • Name: LoopAutoXP
  • Namespace:*
  • Description:
  • Includes (One per line):
    -http://apps.facebook.com/streetracinggame/jobs.php*
  • Excludes (One per line):
SROutOfBounds
  • Name: SROutOfBounds
  • Namespace:*
  • Description:
  • Includes (One per line):
    -http://apps.facebook.com/streetracinggame/*
    -http://* !!Warning: If you include this line, it means everytime you enter ANYTHING, it will redirect to SRAutoXP!!
  • Excludes (One per line):
    -http://apps.facebook.com/streetracinggame/jobs.php*
    -http://apps.facebook.com/streetracinggame/fight.php*
Then, copy and paste the downloaded script accordingly and save.Repeat the steps 3 times accordingly to each given script, then apply the update from my previous post here.

Finally, to run the script, right click on the Greasemonkey icon and enable or click on the icon and ensure that it is colored (if it is grey, it means Greasemonkey is disabled) then refresh the page to let it roll.

Please do leave questions, comments and suggestions on the comment box. Now you can sleep and let the script race for you! Have fun!

BlackBerry: Leaked Skype (BETA)

Source: Komunitas BlackBerry


A member named valentz leaked the long-waited Skype beta version for Blackberry in Komunitas Blackberry forum which is supposed to be a closed beta testing version from Skype. The application itself looked like a java application installed on my BlackBerry since we must use # and @ as buttons for softkeys. When I opened the .jad file using notepad it shows the following:

RIM-COD-Module-Name: skype
MIDlet-Name: skype
MIDlet-Description: BBactionpack
MIDlet-Vendor: : BBactionpack
MIDlet-Version: 1.0

MicroEdition-Configuration: CLDC-1.1
RIM-COD-Module-Dependencies: net_rim_cldc
RIM-MIDlet-Flags-1: 0
RIM-MIDlet-NameResourceId-1: 0
MicroEdition-Profile: MIDP-2.0
RIM-COD-Creation-Time: 1218812329
Manifest-Version: 1.0

RIM-COD-URL: skype.cod
RIM-COD-Size: 75484
RIM-COD-URL-1: skype-1.cod
RIM-COD-Size-1: 67232
RIM-COD-URL-2: skype-2.cod
RIM-COD-Size-2: 86900
RIM-COD-URL-3: skype-3.cod
RIM-COD-Size-3: 55556
RIM-COD-URL-4: skype-4.cod
RIM-COD-Size-4: 54684
RIM-COD-URL-5: skype-5.cod
RIM-COD-Size-5: 55964
RIM-COD-URL-6: skype-6.cod
RIM-COD-Size-6: 41464


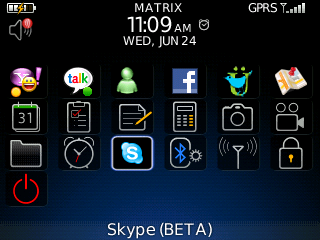
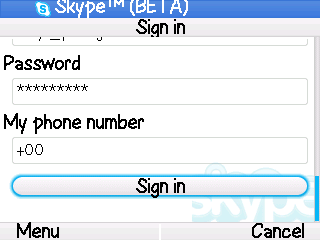
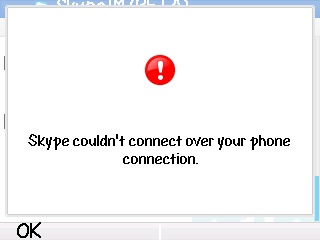
By looking at the details RIM means Research In Motion so it is the actual Skype for BlackBerry. After successfully installed Skype on my 8310 Curve, I configured my account but failed to connect and a message appeared saying "Skype couldn't connect over your phone connection". Below are some screenshot of the application:

So if anyone of you feeling lucky and would give it a try download Skype Beta from here and post your results in the comments, thanks!

6.19.2009

Blackberry: Remove IT Policy

Whenever you purchase a second hand Blackberry either from eBay or from a friend, some of them have IT policy still attached to them. IT policy can be a hassle since most of it won't allow installation of 3rd party applications and such. The following are the steps to remove an IT Policy easily (compilation of sources from the internet):

First you need several files ready first:
  • Blackberry Desktop Manager (comes with the CD or download here)
  • JL_Cmder, a compilation of batch scripts by d_fisher from Blackberry Forums for some cases. For 8110, 8120, 8130 and 8330 with 4.5 OS installed simply use JL_Cmder resetfactory option, restart device and you're done.
  • BlackBerry default blank IT Policy and save it into your BlackBerry installation directory (c:\Program Files\Research in Motion\Blackberry (for other than mentioned above).
To remove the IT Policy, use the following procedure:
  • On Windows XP or Vista, go to regedit (Start>Run)
  • Navigate to HKEY_Current_Users\Software\Research In Motion\BlackBerry\PolicyManager and right-click your mouse and select New/String Value and name it as "Path". Then double click the "Path" and set Value Data to "c:\Program Files\Research In Motion\BlackBerry\policy.bin"
  • Open the Desktop Manager
  • Connect the Device
To verify that the IT Policy has been completely removed, in your device go to Options>Security and check reference to IT Policy and go to Options>Status and type BUYR and now you should see time and data usage instead of IT Policy.

EDIT: for 8310 use JL_Cmder works as well.

Good Luck!

6.18.2009

Facebook: Street Racing Update

Continuing my previous post on Street Racing Cheat, by request of many users I will provide instructions on updating the script. Perhaps my uploaded script had some bugs in it. To fix the looping bug, fix the SROutOfBounds, ensure that the excluded pages includes both of these files (make sure you include the asterisks (*):
http://apps.facebook.com/streetracinggame/jobs.php*
http://apps.facebook.com/streetracinggame/fight.php*

To update the script to include the new races, edit the last line of SRAutoXP replace:
window.location.href = "http://apps.facebook.com/streetracinggame/jobs.php?uid=" + user + "&jcode=24"
with
window.location.href = "http://apps.facebook.com/streetracinggame/jobs.php?uid=" + user + "&jcode=48"

Good Luck!

6.16.2009

Blackberry: A Word Regarding PIN and IMEI Clones

Derived from Kaskus - The Largest Indonesian Community

BlackBerry has been so popular nowadays that even refurbished to blackmarket units are sold like hot cakes. Due to its popularity, there are a lot of people trying to take advantage of this situation. Since BlackBerries are sensitive product (especially to RIM and cellular operators) there are 2 keys which you must really pay attention to which is the IMEI number and PIN number. These two are impeccable and neither could be changed to be kept valid.

A lot of sellers, especially blackmarket ones take advantage of used or even trashed BlackBerries and assemble it to re-sell it. Stolen or unregistered units are usually suspended by RIM and to allow users with suspended PINs there is a method called PIN cloning. This is very popular in the market so I advice you to beware of this. There are 2 procedures you must do to confirm this. It is advisable to perform these procedure before purchasing (or at least at a warranty period if the seller allows it)

The first procedure is to go here and check whether your IMEI is registered as the device you are using. At some cases, the IMEI registered is different from your device (for example you are checking your 8310 device IMEI while in the website, it indicated that the IMEI belongs to 8110) if thats the case then bummer! Return it to the seller or trash it since RIM will eventually block your PIN once it does a sweeping. But if it says that it is unknown, then there are 2 possibilities. The first is that it is unregistered or unlisted (since most US cellulars are not registered here). If thats the case then the second procedure only guarantees 50% that RIM won't block your PIN in the future.

The second procedure is to register to your operator (registration of BB service is required to do the procedure). Go to your operator BlackBerry site (usually http://operator.blackberry.com) and register the device by entering PIN and IMEI. If your device is successfully registered and the first procedure matches then your can relax, otherwise if it gives an error such as "Invalid PIN and IMEI format. Please retype your PIN and IMEI. The Information you provided is incorrect" while you are sure that you entered the correct PIN and IMEI then your out of luck. Good luck!

6.11.2009

Google Analytics: Results

Previously, I showed how to add your blogger site to google analytics here. I have been monitoring my site activity from there, it's cool that I can view page hits, where visitors are coming from, what page visitor landed initially and from where, etc.
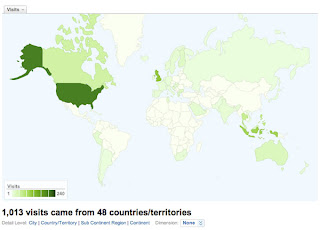
So statistics shows that from May to June 2009, I have 1,013 visitors from 48 countries which seems very strange to me since only very few of them posted comments here. Only 20 out of 1,013 visitors leave comments here. Hello? Where did everybody go? Well, thanks for visiting anyway!

Blackberry: Obama uses 8830 Huron + Leather Swivel Holster

Obama spotted using a black 8330 Huron with Leather swivel holster. Who said he was using a super-whatever-phone-with-windows-ce?

source: engadget

6.10.2009

Sharepoint: Installing Free Ten Themes for Sharepoint in VSeWSS Projects


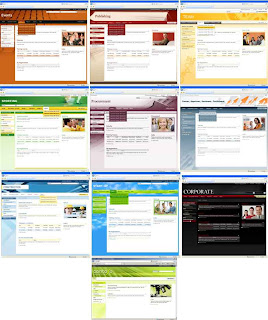
Microsoft has provided free 10 themes for Microsoft Office Sharepoint 2007 since March 2009. For some reason, there are several steps which must be performed in order to use these themes and quite troublesome if I might add.


For some, installing Visual Studio 2008 on a production MOSS server could be a burden in size, security, etc. I would suggest you have a spare machine or a virtual machine and installed the required components.

To Install these themes and apply it to your sharepoint portal site, first there are installers you must already have or downloaded which includes the following:
Before installing the installers above, please ensure that you have the following installed in a single system (preferably Windows Server 2003):
Once everything is in place (all the above requirements are met and the required files are installed) go to the ten themes in Start>All Programs>Ten Themes for Sharepoint in VSeWSS>Ten Themes for Sharepoint in VSeWSS.zip and extract the files to any locations (preferably My Documents\Visual Studio 2008\Project).

Once extracted, go to the theme you wish to deploy and you will see a Visual Studio 2008 solution (*.sln file), open it.

View the solution explorer in Visual Studio and double click on properties. Go to the Debug tab and change Start Browser with URL accordingly to your sharepoint site in which you want to deploy to (the actual production site not your local installed sharepoint if it is not in the same machine).

Build the Visual Studio 2008 solution and browse to your debug files (extracted Ten Themes for Sharepoint in VSeWSS.zip file solution in bin folder) you will see a debug folder and copy the whole folder in a flashdisk or share the folder which allows production server to access it.

Now go to your production server and copy the bin folder mentioned above to any location. Inside the debug folder, run setup.bat and the theme will be installed to your sharepoint site.

Open your portal site as Administrator and go to Site Actions>Site Settings>Modify All Site Settings. Under the Look and Feel Section, click on Site Theme and choose the newly installed theme.

Have fun! Leave comments for questions and suggestions thank you!

Mac OSX: Performing Maintenance

In Mac OSX, maintenance are performed regularly to keep your system always at its peak performance. Since these maintenance scripts are usually run at specific time, most of the time these maintenance are missed or skipped which leads to degradation of performance of your system.

To perform the maintenance tasks (all daily, weekly and monthly routine at once) in case you missed some open the Terminal app, and type:

sudo periodic daily weekly monthly

and let the maintenance script run, it may take a while but the performance of your system may increase significantly for some whenever they miss the maintenance schedule.

Below are some explanation of each maintenance script:

(Taken from http://www.thexlab.com/faqs/maintscripts.html)

Each maintenance script — daily, weekly, and monthly — has a specific function. Their functions have varied over different versions of Mac OS X.

  • The daily script removes old log files, "scratch" and "junk" files, backs-up the NetInfo database (Mac OS X 10.4 Tiger® and earlier), reports a variety of system and network statistics, and rotates the system.log file. Under Tiger, the daily script also cleans up scratch fax files and prunes asl.log, the log file for the then-new Apple System Loggingfacility. Under Mac OS X 10.5 Leopard®, the daily script also prunes the asl.db file that replaced the asl.log file for Apple System Logging.
  • The output from the daily script is written to the /var/log/daily.out file, which can be viewed in Console.
  • By default, the daily script is scheduled to run daily at 03:15 hours local time.
  • The weekly script rebuilds the locate and whatis databases. Depending on the version of Mac OS X, it also rotates the following log files: ftp.log, lookupd.log, lpr.log,mail.log, netinfo.log, ipfw.log, ppp.log, and secure.log
  • The output from the weekly script is written to the /var/log/weekly.out file, which can be viewed in Console.
  • By default, the weekly script is scheduled to run every Saturday at a specific time. UnderTiger and later, it runs at 03:15 hours local time. Under Mac OS X 10.3 Panther® and Mac OS X 10.2 Jaguar it runs at 04:30 hours local time.
    • The monthly script reports per-user usage accounting and rotates — depending on the version of Mac OS X — the wtmp, install.log, and cu.modem.log files.
    • The output from the monthly script is written to the /var/log/monthly.out file, which can be viewed in Console.
    • By default, the monthly script is scheduled to run on the first of the month at 05:30 hours local time.

    5.18.2009

    Mac OSX: Leopard 10.5 Enable Root User

    For Mac users especially for UNIX savvy, enabling root user is essential. This will allow better management of your system and have a separate password whenever you run "sudo" in terminal or X11 app.

    To enable root user in Leopard go to Application>Utilities>Directory Utility from there go to Edit>Enable Root User which will then prompt you with a new password to enter. Once completed, now running "sudo" or "su" will work only with the given password. Have fun!

    Mac OSX: Personalize your login window

    I've been a mac user since a very long time. Currently, my main machine is an aged Black MacBook 1st generation. For some, whenever you leave your mac, you will of course leave it to your login window (in Windows, it is known as lock user by pressing Window+L) so that your computer is safe from the wrong hands meaning that nobody can access your computer (your session at least) without your user authentication.

    In mac, the only way to allow this is by enabling fast user switching first, from there you click on your fast user switching icon (usually on the top right) and select "Login Window...".

    If you want to add more personalized message in the login window such as "This computer is mine", go to the terminal and type the following:

    sudo defaults write /Library/Preferences/com.apple.loginwindow LoginwindowText "This computer is mine"

    Then try to go to the login window and voila, you will see the text just above the user list. Have fun!

    5.08.2009

    Facebook: Street Racing Shortcuts

    Here are some collection of url shortcuts for Znga's Street Racing on Facebook:
    General:
    Perform races directly (1-24): http://apps.facebook.com/streetracinggame/jobs.php?action=Do+Job&job=1
    Heal: http://apps.facebook.com/streetracinggame/stats.php?&cost=1

    Shops:
    Buy Properties (Modify from 1 to 7 for standard items and change amount, 7 is island - last property at the moment): http://apps.facebook.com/streetracinggame/properties.php?action=buy&property_id=7&amount=10

    Stats Increase (Whenever available):
    Offensive: http://apps.facebook.com/streetracinggame/stats.php?type=attack&action=Increase
    Defensive: http://apps.facebook.com/streetracinggame/stats.php?type=defense&action=Increase
    Max Gas: http://apps.facebook.com/streetracinggame/stats.php?type=max_energy&action=Increase
    Max health: http://apps.facebook.com/streetracinggame/stats.php?type=max_health&action=Increase
    Max Adrenaline: http://apps.facebook.com/streetracinggame/stats.php?type=max_stamina&action=Increase

    Challenges:
    One on One: http://apps.facebook.com/streetracinggame/fight.php?action=attack&one_on_one=true&opponent_id=
    Crew vs Crew: http://apps.facebook.com/streetracinggame/fight.php?action=attack&opponent_id=
    Bounty: http://apps.facebook.com/streetracinggame/hits.php?action=hit_attack&target_id=

    Miscellaneous:
    Clear news:
    http://apps.facebook.com/streetracinggame/index.php?news=delete

    Actually, for high level racer, all you need is the Perform races directly and heal. Well if you need anymore links do let me know in the comments. Happy racing!

    Facebook: Street Racing

    Facebook Street Racing Game by Zynga is addictive, people from all around the world joins the fun in this game which includes me. This text-based click game is a real treat to kill time or even working hours hehe... . This very popular game is without glitches. I found out several glitches and you may also call it cheats. Well first off, you need to sign in and allow the Street Racing Game to access your Facebook account, from there on be careful don't rush to play just yet.

    Here i present you some of the glitches:
    Extra Stats
    In your home screen you will see a box allowing you to take quiz for a free 5 point stat, take it! once completed (you can skip the publishing etc) at the end you will find a "race" button. Click there and you will be directed back to the home screen. See the stat on the top-right of the home screen you will see a little +5 stat. Don't click anywhere just yet, click on the "Race" menu. Now see your stat, voila! +26 points.
    This glitch has been recently fixed.

    Extra 5 Favor Points
    Secondly, type the url http://apps.facebook.com/streetracinggame/index.php?action=newbreward and you are granted 5 free favor points other than your first one once you begin.
    This glitch has been recently fixed.

    Extra Stat and Extra 5 Favor Points can be repeated once the server resets (Zynga regularly updates the server, so make sure you check the "take quiz" part, if it tells you to take a quiz for free 5 point stat then be sure to follow both of the above steps. This glitch has been recently fixed.

    Directly Recruit Facebook Friends
    Some properties, bonus cars and even some races (for new players) requires a certain number of crews you have. This works only on players which is also your facebook friends. Go to the "Friends" menu, from there you can race your friends which may or may not be on your crew. Right click on their name and you will see a link something like http://apps.facebook.com/streetracinggame/stats.php?user=655041xxxx which means that this is a player although he is not in your crew. To recruit them officially, you must first add them to your invitation list and they are to approve your request. Well to save time, type this into your url http://apps.facebook.com/streetracinggame/index.php?action=statusrecruit&from=655041xxx and your friend will automatically be added in your crew. Neat eh?

    Free XP without Gas
    Now here's another trick to get you some free XP without spending your gas. Through this you are "supposedly" helping your friend in completing certain races. There are 24 races to complete in Street Racing in which you are allowed to help 1 friend to complete 1 race. Type in url http://apps.facebook.com/streetracinggame/jobs.php?uid=655041xxxx&jcode=1 in which 655041xxxx is any user id number (which can be retrieved from the above way but is not limited to your friends, so it can be anyone's id but do make sure the id is from a valid player otherwise an error will occur). For the last digit (from jcode=1) you can type in the race number valid from 1-24. So 1 user id can get you 24 races which gets you up to 5 free XP without sacrificing any gas.

    Quick Race/Challenge
    To repeatedly race or challenge a person or event, click on the even button (for example 1v1 or race) repeatedly allowing you to save wait time for the loading.

    Autoplay Script
    Well smart people are lazy people. If you play Street Racing using Firefox or any other browser supporting the Greasemonkey plug-in which can be downloaded here can download StreetRacing for Greasemonkey script from here. Once installed, refresh your browser and go directly to Street Racing app for Facebook. Ensure that the monkey face on the bottom-right of your browser is on. A hidden menu just under the top banner can be clicked and configure. From here you can configure it to auto-fuel, auto-race, auto-challenge and set numerous parameters. The current version 1.7.0 is still buggy but working and saves you a lot of time but do check it from time-to-time as it sometimes stops working.

    Free XP without Gas Script
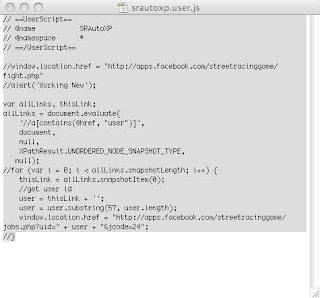
    Well for those feeling lazy to repetetively on getting free XPs, I created my own script which you can use. There are 2 scripts in total, the srautoxp.user.js allows the script to get user id automatically from challenges. Another script loopautoxp.user.js is to loop the race once the id is obtained. The last script loopautoxp.user.js is optional which allows redirection the the challenge page if anything goes wrong. Download your scripts here. Please note that only one type of script is supported at a time. So either you choose the Autoplay Script or Free XP without Gas Script.

    Before running the scripts it would be wise if you save your username and password of your facebook.

    Please do post any other findings you found and let me know how this article helped you in the comments! I came from level 22 to 53 by just leaving the Free XP without Gas Script overnight. Thanks and happy racing!

    EDIT: UPDATES, TUTORIAL

    5.01.2009

    Blackberry: Pip-Boy Theme for Pearl

    The recent Pip-Boy 3000 theme created by crackberry forum member sadosdemetrios was a hit, broadcasted on numerous blogs and dubbed as the most unique theme created made lots of user are demanding the theme ported for their specific devices.

    While I personally never actually tried the theme as the pearl version of the theme is unavailable (I highly doubt that it will be available), I decided to create a version for pearl 81xx. What I plan to do is to create a community-created pipboy theme and to prove that I am perhaps capable of creating, I attached a draft version of the theme which can be installed on your 81xx version 4.5. Special thanks to sadosdemetrios for his fantastic idea and design. This draft was created by screenshots of sadosdemetrios' version for curve and storm so it may appear a little rough on the edges. Feel free to give thoughts and comments on the theme and suggestions are most welcomed.


    Below are some sample screenshots of the draft theme:


    What I would appreciate most is your submitted graphics, mock ups or especially icons which if possible in an editable psd file (upload to any free or paid image host and post the link in the comments) and I will try to create our dream pip-boy theme from the best submitted image free for the community. Oh, and the usual donations are most welcomed, Thanks and stay tuned!

    Download the theme here (contains .alx and .cod for desktop install) I don't know how to create and OTA link and I also lack of resource for it so if you could create one for me and host it, I would really appreciate it.


    EDIT: The theme is actually available. Well lets just keep this as an alternative version.

    4.22.2009

    Official Facebook 1.5 released for Blackberry

    Finally, Facebook 1.5 has been officially released by RIM for all BlackBerry devices. The new features include contact integration allowing you to sync data between your BlackBerry address book with friends on Facebook, calendar integration and messaging application. Switching between tabs has new slide transition, and upload images directly from the Facebook application compression quality seems dramatically imporved while other features seem to not change.

    The version I got for my BlackBerry 8110 Pearl was Facebook 1.5.0.31.

    Get your copy now from your BlackBerry device here and experience the new long last awaited Facebook 1.5.

    4.21.2009

    OOT: Rendy Nugroho wins Photogenic Category from Finalis Wajah Remaja 2009

    Rendy Nugroho Setyanto, a 15 years old boy from Bekasi came out as a winner in Finalis Wajah Model Remaja 2009 in Photogenic category held by Be One Plus Management and sponsored by large TV production house in Indonesia including MD entertainment, Frame Ritz, Rapi Film, Genta Buana Film and Melia Film. The unexperienced boy said that he wasn't expecting anything as this was his first attempt and appears very excited. The event was broadcast by ANTV on "Planet Remaja" and JakTV.


    With the winners price which includes tour to Bali, 3 city road show, casting and acting school, merchandises and contract for 1 year he hopes that he can develop his skills and knowledge in the showbiz world.


    Since he is still in his 3rd Grade Junior High School his manager, Ratih Setya Dewi which is also his sister said that he will complete his examination held on 1st of May first before starting anything.


    Well let's all hope that he succeeded his examination and soon start his debut career in showbiz. Good luck and make us proud!

    Become his fan in Facebook http://www.facebook.com/pages/Rendy-Nugroho-Setyanto/166450120857

    Nav N Go Amigo / iGO 8.4 Review

    Nav N Go Amigo is the latest application from Nav N Go. This new 8.4 version or called Amigo is a significant update on interface and engine (although at some point I would call it downgrade even) unlike older updates 8.0, 8.1, 8.3 which has no visible update. Amigo's interface is clean, simple and very easy to use.

    The home screen as you can see from the screenshot above looks great, it features a small actual moving map and will go full screen when clicked. Navigations such as destination, my route are similar to older version save for .... and settings has been changed to More. Menu navigation is much easier than ever, going through places has never been easier. The find places has also boast a new interface allowing you to click on an image instead on regular menu in previous versions.


    New features has been added such as games which allows you to install games and run directly from Amigo, 3D images of cars, so instead of the default blue arrow, you can now change the 3D object to be a car, truck, person, flying carpet etc. which is awfully similar to Garmin Mobile XT 5. POIs on the map now looks like bubbles as found in Google Earth instead of a circle on previous versions. On screen display such as speed, 3D object settings, night mode can be accessed by clicking on anywhere on the screen and a nice interface will appear allowing you to select which type of items showing you want.

    Scrolling and browsing now possible only by clicking on an icon on the most right on the screen which is much better than previous versions which allows you to browse map, zoom in and out directly by clicking anywhere on the map screen which causes accidental presses which then messes the map display.


    The map display is now cleaner and easier to read, the road lines are better and more detailed with much better choices of colors. Unfortunately what makes me most disappointed at was the rendering. Now movements are choppy which is similar to other GPS software solutions such as Garmin or SmartST.


    The file system has also changed which now incorporates .GRO files instead of the usual .ZIP file which we all love to extract and modify.


    Verdict: Not recommended stay with older version 8.3 or 8.0
    Pros:
    New sleek and simple interface, colors, games, 3D cars
    Cons: Choppy movement, not smooth like previous version, file uses .GRO instead of .ZIP so customization harder


    Give it a try yourself at http://rapidshare.com/files/223838002/teman_spanyol.zip (Please note that I do not support piracy. Please purchase the original copy if you decide to use it. I held no responsibility of any actions you make from this).

    Have fun!

    4.15.2009

    Windows Live Writer 2009 Review – Makes your blog easier

    A friend of mine referred to me to an application called Windows Live Writer so that I can update, edit, design and manage my blog easier. Get your copy here for the application. The application itself looks like Microsoft Office Word allowing you to change fonts, paragraph format and many others to create your blog easier. Windows Live Writer 2009 supports Windows Live! Spaces, Sharepoint Blog, Blogger/BlogSpot, WordPress, TypePad and many others. In fact, this is my first post using this application and I will let you know how it goes, the problem i'm having is that some framing is still confusing, since this is my first try perhaps it is because I do not know how to show hidden layers. After posting it seems perfectly fine, all goes as expected, publishing went seamlessly. All in all, this application looks great. Go try it yourself its free!

    Google Analytics: Adding BlogSpot/Blogger site

    Google introduced Google Analytics not so long ago. This site allows you to see the statistics of your website including visitors, most viewed pages etc. The challenge here is how can you get your blogspot/blogger site to be analysed in Google Analytics.

    First thing is you must access analytics by visiting http://www.google.com/analytics and complete the registration and create a new domain by entering your blogspot address. Once completed, you will be provided with a code block, copy it to a notepad or somewhere accessible.

    Then, open your BlogSpot/Blogger dashboard and click on Layout. In layout, click on the "Edit HTML" tab. Scroll down until almost the end of the textbox you will see:

    </div></div> <!-- end outer-wrapper -->

    Paste your code block provided here.

    </body></html>

    the click "Save Template" and go back to the google analytic site and let the site process your site's data and voila! Have fun!

    Google Maps: Indonesia Map View Available

    Google Maps now uses TeleAtlas as their provider for Indonesian maps. Previously, they used TeleAtlas only for Google Earth while for Google Maps they used NAVTEQ which does not have Indonesian maps.


    When zoomed to a certain country or region, if you perform a search, the result will show only items on that region. Give it a try and search for "Bengkel Mobil Setya" whenever you're viewing Jakarta region.

    TweetDeck Review - Twitter and Facebook Status Integration

    Ever got tired of updating your status twice for Twitter and Facebook? if yes, why not give TwitterDeck a try? TwitterDeck is a Twitter client dashboard application developed using Adobe AIR (installation of Adobe AIR required which will be automatically performed while downloading TwitterDeck) which allows status update integration with Twitter, Facebook and others. Since the platform used is Adobe AIR, TwitterDeck supports PC, Mac and Linux and perhaps more when Adobe AIR is available on other platforms.


    The interface is nice, clean and simple, all you need to do is login your Twitter account and status, replies and direct messages of your friends will appear. To add other clients such as facebook, simply click on the facebook icon on the top and it will ask you for your permission to allow this application to update status.


    Friend updates will appear on the top right of your screen which can be removed. However, you cannot customized what will appear on the popup (for example if you want the popup to show only your friend's Facebook update). Other than that, the application is working seamlessly, hopefully that minor problem can be fixed during the release.

    4.13.2009

    Nav N Go / IGO 8.3.xx Application plus Indonesian contents

    The new IGO 8.3 or R3 has been around for some time now. What's new is that Indonesian content was very hard find since the new 8.3 version uses Naviextra's maps which is different from IGO 8.0. To make it easier for everyone to obtain a copy, below I would like to summarize the important links:

    EDIT: For those who only need english voice and language can ommit the above Voice and Language File and download the file from http://rapidshare.com/files/221863216/igo8englishvoiceandlang.zip.

    For the latest IGO 8.4 (R4) or IGO Amigo, you can get your copy from http://rapidshare.com/files/219805682/amigo_mar12.rar (pass: moslek).

    Since I included map and POI for version 8.0 in the link above (map is March 2008), I will also provide IGO 8.0 link for those who would prefer 8.0 version:

    Please note that I do not held responsibility for any damage or anything caused by your download. The downloads are provided as is and is found in the internet and available through the use of search engine. I do not support piracy, if you like the software, purchase a copy to support developers. Have fun and don't forget to leave comments and suggestion!

    4.06.2009

    BlackBerry App World Goes 1.0.0.28

    Just yesterday, yet another update for the BlackBerry App World from previous 1.0.0.27 to 1.0.0.28. This time RIM comes with a KB which can be viewed here. It is said to fix issues regarding:

    • Failed to Transmit
    • PayPal authentication failed. Please try again.
    • BlackBerry App World is currently unavailable. Try again later.
    • BlackBerry App World is having trouble connecting to the BlackBerry App World server. Verify your network connections and try again.

    Still no sign of Facebook application in the list though.

    4.03.2009

    Blackberry: Facebook Application Missing from Blackberry App World


    Just today afternoon GMT +7 I realized that Facebook application was missing from my Blackberry App World Social Networking & Sharing section. While this morning I checked and it was still there and the version was still 1.2. I keep monitoring on Facebook application due to the awaiting of Facebook Application 1.5. So could this be it? is RIM finally uploading Facebook 1.5 to their servers or is it only my Blackberry? Can anyone confirm? Thanks!

    Blackberry: Blackberry App World Review


    Yesterday, while browsing to Blackberry Help from my phone, I found out that RIM had release Blackberry App World. The long awaited Blackberry application which is said to be competing with Apple iPhone App Store. Well the main focus is the same: to help users find software easier and better in a single application rather than having to download from several places.


    Well personally I think all phones should have this feature as it is very useful. The file size is about 523.4KB and it requires users to restart their phone to use it. Also, RIM included nice collection of wallpapers for your Blackberry device.

    All in all, the interface is nice and looks like the default Blackberry Bold theme UI (Blackberry version 4.6). When you first open the application, it will present you with Featured Items with a nice scrolling UI and several icons below it to Categories, Top Downloads, Search and My World. When you select an application, it will show a description of the application and allow you to select several options:

    • Download - allowing you to download this application directly
    • Reviews - read reviews on this application
    • Recommend - recommend this application to your friend via email, MMS, PIN or SMS
    • Screenshot - showing a screenshot of the application
    The best feature I liked from Blackberry App World is to allow you to view screenshots of the application. Very useful whenever you wanted to know what the application does.

    Below are several screenshots of Blackberry App World:


    The current version I downloaded yesterday morning was 1.0.0.26 and I re-downloaded it and got a newer version 1.0.0.27 and no information on the newer build perhaps there was bug fixes?

    The reason I had to re-download was because I could not delete the downloaded application history, even after I deleted the application it would still be listed in "My World". Well, upgrading to the newer version deleted the installed application history. Funny thing is I thought updates on certain application will appear here but after re-installing the Blackberry App World, it wiped all downloaded application without warning.

    Blackberry: RIM Introduces Blackberry App World

    There's a new application from RIM to blackberry users with the following conditions:

    1. BlackBerry® Device Software version 4.2 or higher
    2. BlackBerry smartphones with trackballs or SurePress™ touch screen
    3. BlackBerry App World is only available to customers in US, Canada and UK and may not be available on all networks
    4. To use BlackBerry App World, you require a service plan that includes access to the BlackBerry® Browser
    Get your copy OTA now here.

    3.19.2009

    Sharepoint: Changing Site Port

    There are several ways to change a port of a web application in MOSS 2007, the easiest is as easy as performing two simple tasks:

    1. Open Start>Control Panel>Administrative Tools and select Internet Information Services (IIS) Manager or simply hit Windows+R and type "inetmgr" and enter. Drill down inside the directory of IIS>[local computer name]>Web Sites>[Name of Sharepoint Site] and right-click on it and click Properties... and there you can see TCP Port, change it to a new port you desired (for example: from 91 to 27).
    2. Open the Sharepoint Central Administration, go to the Operations Tab and click the Alternate access mappings (AAM) under Global Configuration. Click on [Name of Sharepoint Site]:91 and simply change it to [Name of Sharepoint Site]:27.
    And you're done! Good luck, if you have any inquiries, please leave a message and I'll try to help you.

    3.18.2009

    InfoPath 2007: Publishing Form to MOSS 2007

    Continuing my previous post, to publish your InfoPath Form there are several method and here I will show you the easiest way to publish to Microsoft Office Sharepoint Server 2007 (MOSS 2007).

    From you completed design on InfoPath which is fully web compatible and configured, you must save the file to a location (preferably on your local disk so you can update or edit at a later time when necessary).

    If you closed the InfoPath 2007 application and want to open it again to publish it, right-click on the file you created and select Design.

    To publish go to File>Publish... then a publishing wizard will appear. Select To a Sharepoint server with or without InfoPath Form Services then select next and enter your MOSS 2007 site (include the subsite and document library where you want to publish the form) then select next then check the Enable this form to be filled out by using a browser and select document library on the radio button below it then click next to continue.

    Here you can select whether you want to create a new library or update a form template in an existing document library. I would suggest you to create a new library if you haven't prepared any yet and enter a name for it then click next, then in column name, you can enter which columns will appear on the document library list in the MOSS site then click next and click Publish to finish.

    Once that is completed, you can finally close the InfoPath 2007 application and open web browser and go to your MOSS site to the document library where you published you InfoPath Form (usually ending with .../Forms/AllItems.aspx) then click on Settings on the top bar of the list and select Form Library Settings.

    Under General Settings, click on Advanced Settings on the next page under the third category Browser-Enabled Documents select Display as Web Page then click OK.

    Now open a new window, open the document library again and click on the downwards arrow just next to New on the topbar of the list, it should now show two options: New Document and New Folder, select New Document and the InfoPath Form should now appear as a webform instead of firing up InfoPath application. This way clients without Microsoft Office InfoPath can also open your form.

    InfoPath 2007: Designing Web Browser-Enabled InfoPath Form

    To enable Web Browser capable InfoPath Form, before you want to design anything ensure that all controls are browser enabled (meaning that it is web browser enabled) by going to Tools>Form Options... and select the Compatibility category which is the second last on the left listbox.

    Check "Design a form template that can be opened in a browser or InfoPath". Then start designing your form using the available controls (the default controls will reduce and will only show web enabled controls). If you already designed your form and want to only check which controls are incompatible, go to Tools>Design Checker and click on the refresh button on the Design Checker toolbar. If all controls you are using are compatible, no error will appear.

    Finally, if you want a submit button (for better user experience since most of forms usually automatically closes and automatically saves data and do all sorts of stuff, go to Tools>Submit Options... and check the Allow users to submit this form. Many options will become available.

    To perform a basic submit and save to a sharepoint list, in the Send form data to a single destination, select Sharepoint document library. By selecting this, you must first create a data connection to your sharepoint list.

    Click the Add... button and in the Document Library textbox, enter your sharepoint list url, and for the filename, it is recommended entering key information such as ID or anything unique from one another to differentiate form entries. Also include date and time as the filename to prevent duplicates. To do this click on the Fx button beside the filename.

    Here you will be presented with a formula textbox. Click Insert Function... select Text from the Category in the left listbox, and select Concat in the Function listbox on the right. You will then be automatically redirected back to the previous formula textbox. Double click on the guide text "double click to insert field" and select which textbox form you want to include as the filename (I would suggest anything about ID). Once selected, the guided text will be replaced by the field you have selected. Now to add date, single click on the second "double click to insert field" and click Insert Function and select Date and Time as the Category on the left side and select Now in the Function on the right side. Delete the third guided "double click to insert field" text or if three is not enough for your preferences, you can add more seperated by coma. It should look something like the following:

    concat(field1, now())

    This will be the filename of each submitted form using the InfoPath Form Services generated by Sharepoint. Then click next until everything is verified and correct and you will be redirected back to Submit Options. Click on Advanced and more options will show, on the After submit dropdown menu, select Close the form and finally click OK and you almost done.

    Save your form before publishing by clicking File>Save.

    Sharepoint: Moving a Site Level Up / Down


    Let’s say you created a sharepoint site your root level (ie http://intranet/website) and six months later you decide it really should be contained under your IT subsite (http://intranet/it/website). You can use the program STSADM to move a site from one location to another.

    Steps to move a WSS subsite.

    1. Create the new target URL (I created a blank site @ http://intranet/it/website)


    2. Fire up the command line


    3. type the following including the quotes:

    cd\"Program Files\Common Files\Microsoft Shared\web server extensions\12\BIN"


    4. Export the old URL using the following Command (this will export and backup the whole site to a single file):

    stsadm -o export -url http://intranet/website -filename c:\test\backup.cmp

    5. Import the file back into Sharepoint using the the following command (this restores a previously backed up file to a defined site):

    stsadm -o import -url http://intranet/it/website -filename c:\test\backup.cmp

    That’s it! You have moved your website. You need to check user permissions especially if you are moving to a new subsite!

    OTHER COOL STUFF: There is an option to -includeusersecurity while you do the export. You can also choose whether or not to pull all the revisionhistory over with the doc libs or not…

    For a full view of options for Export / Import, run the following commands to see all your options:

    stsadm -o export

    stsadm -o import

    These will print out all your possible options for doing these two operations!

    Basic Table for layout

    I would like to explain several things regarding html basics which some people probably knew already or not. No matter, what you should know is that layouts of any website, I mean any website with good layout are organized in tables. Tables are easier to manage with specifying rows and columns. Rows are defined as <tr> and columns inside rows are <td>. So it will not show if you define <td> before <tr>. For a single row with three column will show as the following:

    <table>
    <tr>
    <td>a</td>
    <td>b</td>
    <td>c</td>
    </tr>
    </table>

    which would look like:

    -----------------
    | a | b | c |
    -----------------

    Now, what would really look cool is if you have some sort of image or text which could appear right in the middle of the web browser no matter if the browser is resized, it could maintain the 'middle'-ness.

    For that you can define tables to align everything to the middle.

    For the record, there are several versions of HTML document definition which you could read from W3C, but basically, the higher the HTML version, the more features it has. The latest version to date is HTML version 4.01 which has cool features that you can read from W3C.

    Unfortunately, when you create a HTML page in Dreamweaver whether blank or template, it defines the version of HTML as version 1.0. So what you need to do is change the DocType before the <head> tag by replacing everything before <head> with the following:

    <!DOCTYPE HTML PUBLIC "-//W3C//DTD HTML 4.01 Transitional//EN">
    <html lang="en">
    <!-- $Id: cover.html,v 1.2 1999/12/24 23:37:45 ijacobs Exp $ -->

    If you do not however, the page height would not be detected since HTML version 1.0 does not include this feature therefore rendering the page to be aligned on top of the page.

    Once completed, your HTML document will be recognized as version 4.01 which supports table height. Now once you create a table, you should set the height to 100% and set the column to align center and valign middle. The following example shows the text "Hello World" right in the middle of the page regardless setting the browser height by the visitor:

    <table width="100%" height="100%" border="0" cellspacing="0" cellpadding="0">
    <tr>
    <td>&nbsp;</td>
    <td>&nbsp;</td>
    <td>&nbsp;</td>
    </tr>
    <tr>
    <td>&nbsp;</td>
    <td align="center" valign="middle">Hello World</td>
    <td>&nbsp;</td>
    </tr>
    <tr>
    <td>&nbsp;</td>
    <td>&nbsp;</td>
    <td>&nbsp;</td>
    </tr>
    </table>

    Notice the table is set height and width to 100%, this means the table adjusts itself to 100% for the height of the browser and 100% for the width of the browser allowing it to fill the entire browser area. Notice also that the <td> align is set to center and valign to middle meaning that the content in that column is horizontally centered and vertically aligned in the middle. This example is a 3x3 table if you notice 3 <tr> (row) and 3 <td> (column) inside each <tr> (row).

    Happy layout-ing!

    Publishing Sharepoint 3.0 with Active Directory through ISA 2006

    Microsoft technology can be quite complex but pretty much straight forward. Here I would like to explain how to publish Microsoft Office Sharepoint Server 2007 (Sharepoint 3.0) on an active directory (joined domain) with Microsoft Internet Security and Acceleration Server 2006. Before we get going let me explain a little bit about it:


    Microsoft Office Sharepoint Server 2007 (Sharepoint 3.0) is something of a content management solution (think joomla, phpnuke, etc where you need not develop a website from scratch but simply customize whats available and focusing on content you wish to deliver. The concept of sharepoint is quite different from joomla and other CMS as this is meant for enterprise solution, it is usually for intranet because it handles file sharing, forms and lots of features which requires huge bandwidth but of course you would want to publish some content you feel fit to be broadcast. Sharepoint main components are farms (think land/area in which many sites are placed in), site collections (think houses which are placed on the land/area, which can also be considered as website) and of course sites (think rooms inside the house, which is also considered as webpages).


    Active directory is something like a domain consist many users inside it which holds user profiles, preferences as well as many other things. The benefit of using active directory is once registered, a user can use any computer (including server) joined in that domain using their username, profile and password stored in the active directory. Users of course are grouped accordingly to their roles such as administrator, approver, etc. and are cotained in a domain controller server.


    Microsoft Internet Security and Acceleration Server 2006 is the main gateway for the internet to an internal network. Its hardware consist of 2 Network Interface Cards holding 2 ip adresses (1 for internal and the other for internet). ISA combines many features and roles, mainly firewall and NAT. Think of it as the main gate of a village which is well-guarded and secured.


    So, to continue, you must already set all three components in your network as each will play a role in this article.


    To start, lets say you have configured Windows Server 2003 R2 on all servers and all are joined in a domain set up in your domain controller server using a single administrator from that domain. On a server lets say you have installed Microsoft Office Sharepoint Server 2003 successfully including the site collection (which holds the main website for example access to the server can be reached by entering: sps.samplesite:80 in the address) and working locally within your network. On another server, lets say you have installed ISA server and configured it and is currently working properly (meaning the firewall rules are working and users in your network can browse the internet).


    Now it would be unlikely to tell your network users to access your site by entering sps.samplesite:8011 because it would seem odd and difficult to remember. Go to the Sharepoint 3.0 Administrator, head for Operations>Global Configuration and find alternate access mappings. This holds the information of the url which is allowed to be used to access your website. Set a new public url and enter a good name, in this case sps.samplesite.com and set it as default. Once completed, your website can be accessed locally by entering sps.samplesite.com. However not on other computers. Please note that you should keep the default sps.samplesite:80 11 as if you change it, the whole site will change to the new name which in some cases could cause some problem.


    Now head for the Domain Controller Server and go to Administrative Tools>DNS and inside Forward Lookup Zones, you will find your domain name, for example samplesite.com and you will see a list of names of computers registered in your domain. Now, right click on samplesite.com and select Add New Host (A) and enter sps so the FQDN (Fully Qualified Domain Name) would appear as sps.samplesite.com. Enter your Sharepoint server ip address and hit Add. Now you can browse to your website from any computer within the network by entering sps.samplesite.com.


    Ok, your website is up and running locally and users can access and share information within the network. So lets take this website to another level so it can be accessed from anywhere in the world with internet access.


    Head for ISA server, open ISA Server Management and inside Arrays, you will find the name of your ISA Server and inside it find Firewall Policy (Server_Name). You will find a set of rules created earlier which allows internet access, block specific sites, etc. Now right click on the Firewall Policy and enter new>Sharepoint Publishing Rule. You will be introduced with a wizard, follow it.


    First you must set the name, lets say Publish sps.samplesite.com and hit next.


    Now you are asked for your publishing type. If you wish to only publish a single web site, well, select it. But I would recommend you to select Publish a server farm of load balanced web servers which allows you to publish other sites within your sharepoint farm without having to configure it again.


    Once you click next, you are asked whether you are using SSL or non-secured connections. Since SSL are quite slow and you already have ISA configured, I would suggest you to select Use non-secured connection because you are trying to publish a high-bandwidth website and you dont want to make it slower.


    Next you are asked to enter Internal Site Name, enter sps.samplesite.com which you have just set in your DC-server.


    Next you are to enter your sever farm name, click on new to add your farm. A New wizard will appear, enter your server farm name and click next, now inside it, add your server by clicking Add, enter your computer name or ip address. Once done, hit next. Now you must enter a method of the ISA to monitor the connectivity of your sharepoint server, I would suggest Send a ping request as it would be the fastest and easiest solution to check. Hit next and your done.


    Click next again would allow you to enter the public name details. Enter your public name which is sps.samplesite.com (assuming you have registered the name sps.samplesite.com in your ISP). Hit next to continue.


    Now you are asked to select a web listener. This means ISA would redirect users from this listener to your sharepoint website. Hit new, and enter your web listener name. You are once again then asked whether you want to use SSL or not, but if you selected non-secure connection previously, select Do not require SSL secured connection and hit next. Now you are presented with a list of sources which would access your website. Since you want to publish your site, you must assign 1 free public ip address provided by your isp. Click on External and click on Select IP Addresses. A popup will appear, select the third one since you don’t want all traffic heading to your website. Add a new ip and enter your free public ip address provided by your ISP and click add. Then on the web listener click next, which then would allow you to choose how your users are able to login, as starters, I se HTML Form Authentication which then allow users to login using a login page provided by ISA. On the bottom, you are asked how ISA will validate the credential, select Windows (Active Directory) since you have DC-server configured and all users are logged in using joined domain. Hit next and uncheck the Enable SSO since you dont need it and your done.


    Next you will be asked for Authentication Delegation, select NTLM Authentication if you have set it in the sharepoint administrator 3.0 or leaved it as default.


    Next you will be asked for Alternate Access Mapping Configuration, select Sharepoint AAM is already configured as you have set it in the beginning from sps.samplesite:80 to sps.samplesite.com and hit next.


    You will be presented with user sets, if All Users is already in the list hit next, if not then add All Users. Hit next and your done!


    You can check your sharepoint website and make sure its working, if not, see if you missed something or if you’re still stuck feel free to leave comments here. Have fun!

    Moving Blog

    So, I'm moving my old blog here instead as it is more visible than the other one.